You'll begin by opening the completed version of the Scaal home page in a browser so that you can refer to it while working.
| 1 | Choose File > Open, navigate to the Sites/Scaal_site folder, select scaal_home.html, and then click Open. |
| 2 | Press F12, to preview the page in a browser. |
The home page appears in the browser.

|
|
| Leave the browser window open in the background to refer to as necessary. | |
| 3 | Click in the Document window of the scaal_home.html document, and then choose File > Close to close the document. |
Layers are ideal for creating complex page layouts, since you can easily reposition page elements that have been placed in layers by dragging them. You'll lay out the home page using layers, and then convert the layout to a table layout so that the page will accurately display in both 3.0 and 4.0 browsers.
You cannot convert layers to tables if the document being converted contains nested or overlapping layers.
| 1 | Choose Window > Layers to open the Layer palette. |
| 2 | Make sure the Prevent Overlaps box is selected. |
| 3 | Click in the Document window of the my_scaal_home document to make the document active. |
| 4 | Choose Insert > Layer. |
| A layer is added to the document. | |
| 5 | In the Object palette's Common panel, click the Draw Layer button.

|
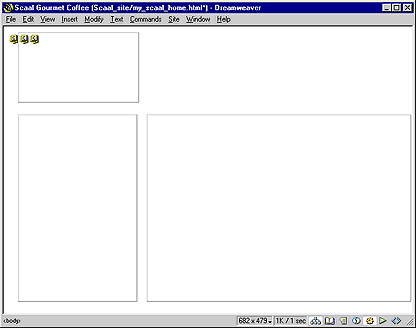
| 6 | Move the pointer to the Document window; the pointer changes into a drawing tool. In the space below the first layer, drag the pointer to draw a new layer. |
| 7 | Repeat the actions in steps 5 and 6 to draw another layer. |
Your page should look similar to the screen below.

|
|
You can change the position or shape of the layers in your document.
| 1 | Click the border of the layer. |
Handles appear around a selected layer:

|
|
| 2 | To resize a layer, click a layer handle, and drag the handle to the desired size. |
| 3 | To move a layer, do one of the following: |
| Use the arrow keys. | |
| Hold down Shift and use the arrow keys to move a layer five pixels in the direction of the arrow used. | |
| Click the tab in the top left corner of the layer and drag the layer to the desired position. | |
Now you'll insert the Scaal logo image in the document.
| 1 | Click anywhere in the uppermost layer. Clicking in a layer places the insertion point inside the layer without selecting the layer. |
An active layer with an insertion point in it looks like this:

|
|
| 2 | Choose Insert > Image. |
| 3 | In the Select Image Source dialog box, locate the Sites/Scaal_site/Images folder, navigate to logo_scaal.gif, and click Select (Windows) or Choose (Macintosh). |
The image appears in the layer.

|
|
Now you'll add images for navigation buttons.
After you add the button images, add space between the graphics: add a paragraph return after you insert the images.
| 1 | Place the insertion point in the navigation layer (the bottom left layer). |
| 2 | In the Object palette's Common panel, click the Insert Image button. |
| The Select Image Source dialog box appears. | |
| 3 | In the Images folder of the Scaal_site, navigate to btn_ourstory_up.gif, and then click Select (Windows) or Choose (Macintosh) to insert the image. |
| The Our Story image appears in the layer. | |
| 4 | Position the insertion point after the image in the layer, and press Enter (Windows) or Return (Macintosh) to add space between this image and the next image you insert.

|
| 5 | In the Object palette, click the Insert Image button, and in the dialog box that appears select btn_products_up.gif, and then click Select (Windows) or Choose (Macintosh). |
| 6 | Position the insertion point after the image in the layer, and press Enter (Windows) or Return (Macintosh). |
| 7 | In the Object palette, click the Insert Image button, and in the dialog box that appears select btn_thisweek_up.gif, and then click Select (Windows) or Choose (Macintosh). |
Your document layout should look similar to this.

|
|
Make a habit of naming the elements in your documents. Later, when you need to reference or select a particular image, layer, or some other document element, you'll be able to easily identify it. You'll be referencing these images later in the tutorial, so name them now.
| 1 | In the Document window, click the Our Story image to select it. |
| 2 | In the Image field of the Property inspector, type ourstory.

|
| 3 | Repeat these steps, selecting and naming the other two images in your document. Name the second image products and the third image thisweek. |
Now you'll add text to the remaining layer.
In Dreamweaver, you can type content directly into a layer, or you can cut and paste content from another document into a layer. In this tutorial, you'll add text to the layer by copying and pasting content from an existing text file to a layer.
| 1 | Choose File > Open; then, in the Scaal_site folder, open DW3_copy.txt. |
| The DW3_copy.txt document opens in a new Dreamweaver Document window. DW3_copy.txt is the file you'll copy the text from. | |
| 2 | Choose Edit > Select All to select the document text. |
| 3 | Choose Edit > Copy to copy the text. |
| 4 | Close the DW3_copy.txt document. |
| 5 | In the my_scaal_home document, position the insertion point in the bottom right layer. |
| 6 | Choose Edit > Paste to paste the text into the layer. |
You can format text in the Document window by setting properties in the Property inspector. First, select the text you want to format, and then apply the changes. You'll change the font and size of the text.
Before you format the text, you'll create a couple of paragraphs. Add a paragraph return after the first sentence and after the second sentence.
| 1 | If the Property inspector isn't open, choose Window > Properties. |
| 2 | With the insertion point anywhere in the layer, press Control+A (Windows) or Command+A (Macintosh) to select all the text in the layer. |
| 3 | In the Property inspector's second Format pop-up menu, which currently reads Default Font, select Arial, Helvetica, sans-serif. |
| 4 | In the Size pop-up menu, select 3. |
| The text in your document automatically updates to reflect the changes. | |
Add a background color to a layer
You can also use the Property inspector to set the background color of a layer. You can select a color using the color picker, or you can type the hexadecimal code for a color.
| 1 | Click the border of the layer that contains the text to select it. (Handles appear around a layer when it is selected.) |
| 2 | In the Property inspector, click the BgColor color box. |
| The color palette and eyedropper icon appear. You can use the eyedropper to "pick up" any color in the visible work area, in addition to picking colors in the color palette. | |
| 3 | Move the color picker icon to the Scaal logo and click the gold that surrounds the letter S. |
The layer background color is updated.

|
|
Now that you've completed the design of your page—laying it out using layers—you'll convert the layers to a table layout so the page can be viewed by users with 3.0 browsers.
When you convert layers to a table, Dreamweaver creates table columns, rows, and cells to fit the layers on a page. To reduce the number of table columns, rows, and cells you create as you convert the document layout, align layer elements before converting a document. Use the Property inspector to position layers in a document.
First, you'll resize and move the layers as you design your page; then you'll set the position of the two lower layers so they align at the top.
| 1 | Resize the top layer by dragging the layer handles in until they just surround the Scaal logo and the text following it. |
| 2 | Resize the navigation layer (the bottom left layer) by dragging the layer handles in until they just surround the images. |
| 3 | Move the text layer so that it is positioned next to the navigation layer. Select the layer, and then use the arrow keys or drag the layer by the layer tab. (The layers won't overlap, because Prevent Overlap is selected in the Layer palette.)

|
| 4 | If all the layer property fields aren't visible in the Property inspector, click the expander arrow in the lower right corner of the Property inspector. |
| 5 | Select the layer that contains the navigation images. Hold down Shift and select the layer that contains the text. |
| Both layers are selected. | |
| 6 | In the Property inspector's T field, type 100px. This precisely positions both layers 100 pixels from the top of the document.

|
| Click anywhere in the document to deselect the layers and to see the layers align. | |
Now that you've laid out the page, convert the layers to a table so that the page will be displayed accurately in 3.0 as well as later version browsers.
| 1 | Choose Modify > Layout Mode > Convert Layers to Table. |
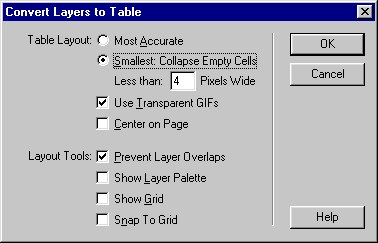
The Convert Layers to Table dialog box appears.

|
|
| 2 | In the Convert Layers to Table dialog box, under Table Layout make sure that Smallest: Collapse Empty Cells and Use Transparent GIFs are selected. |
| 3 | Under Layout Tools, make sure that Prevent Layer Overlaps is selected. |
| 4 | Click OK. |
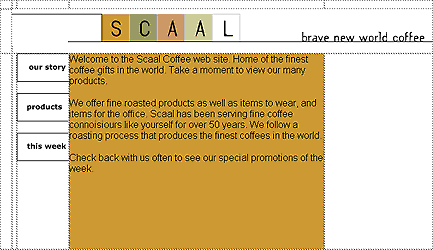
The layers are now converted to a table.

|
|
| Note: Dreamweaver sets the space between the table columns and rows using transparent GIFs. After converting layers to a table, you'll see the file tranparent.gif in the root level of your site folder. Don't move this file to your Images folder; if you do, you'll see broken image icons when you view your page in a browser. | |
| 5 | Close the Layer palette. |
| 6 | Save your file. |